The MiniBrew Craft is an all-in-one, automatic beer brewing machine created to transform beer lovers into craft beer brewers. When information about MiniBrew was first sent to us it really piqued my interest. From the outside, it appeared MiniBrew had made an elegant home brewing system that wouldn’t look out of place in any kitchen so when they sent us a unit to review we couldn’t wait to put it to the test.
The craft brewing sector has exploded in Ireland over the last number of years and it’s not uncommon now to find shelves full of a myriad of choices in your local supermarket, but wouldn’t it be great if you could create your own masterpiece at home? That’s the vision MiniBrew are promising. Read on to see how we got on when we brewed our first beer.
The short answer to this is a lot! Three boxes arrived at our door. One for the main appliance, one for the keg and one for the service packs and brew packs. Inside the boxes, there are a number of different parts which will be used during the different steps in the brewing process. As most of these parts are alien to you, it can be a little foreboding but once you have everything laid out you can start to familiarise yourself with the different pieces and get ready to begin.
Every part of the process is controlled by an iOS app. This would usually make me a little nervous but in fairness to MiniBrew they have created an excellent app and it has been flawless during our use.
Rather than focus on the app here, we’ll go into more details about it in the different steps as we go down through the review.
It is also worth highlighting now that there is another option for controlling the system through a web-based portal but access to this is through an additional purchase. The web-based system offers more options for controlling each step of the process and is aimed at people who have more experience in the brewing process. We’re not reviewing that end of things here as we are complete novices!
Brew Packs contain all the ingredients you need to brew your beer. This includes the malt, yeast and any other ingredients for adding flavour to your beer. At present, there are 15 different brew packs available to purchase and they range in price from €17.99 to €29.99. You can read more about the available packs here. The average brew time is about 3 weeks so with the 15 different options available you basically have enough variety to keep you brewing for a full year!
For our first brew, we used a brew pack called Wiltenburg – Weizen which is a “famous German Wheat beer with a hint of banana”.
There are 3 main stages in the process as set out by the MiniBrew app. First is the brewing stage, then comes fermentation and finally is the serving stage. Inside each stage, there are multiple steps which need to be completed. I’m not going to go into great detail on each step but more so focus on how MiniBrew manages everything and how it helps you to complete the steps.
Before You Begin
While we were waiting for the MiniBrew Craft to be shipped to us, MiniBrew sent us some operating procedures to read through to begin familiarising ourselves with what lay ahead. One item I probably didn’t pay enough attention to was the fact that the appliance needs to be connected to a water supply. The water supply is used for cooling and for the cleaning and flushing steps.
The connection that is needed is the same as the one used for dishwashers and washing machines so this needs to be kept in mind when picking a location for the appliance. The water also needs somewhere to flow to so a drain is also required.
For me, this ruled out the office so I took the device home and set it up beside my kitchen sink and used the water connection that my dishwasher usually uses.
If you don’t have easy access to such a connection for the water, it is relatively straightforward to add one to a cold water supply in your home. Local DIY shops offer kits that can be fitted without the need to cut into copper or qualpex pipes.
Let’s Go!
So you are ready to brew your first beer, you have everything set up but how much time do you need to set aside to do this?
From our experience going through this, you really need to have a 12-hour block available on Day 1. That’s not to say you have 12 hours of work ahead of you, far from it, but from the time I started to the time I tided up and no other input was needed from me on that day was about 12 hours.
Once you have the water situation solved, the first step is to register your new equipment in the app. To do this you scan a QR code on the back of the appliance. The app then walks you through connecting the appliance to your WiFi network and once that’s complete any available updates are applied. These steps took about 45 minutes to complete.
Once you have selected which beer you are going to brew you then need to start a new brew from within the app. The first thing you are asked to do is scan another QR code on the brew pack. This loads up the recipe and begins the process.
As you can see in the screenshots, the app breaks each stage into segments of a circle that act as a status bar to show you how far along you are in each step. There’s also a timer at the bottom and towards the top, there is a bar which lets you know when you will be needed next to perform an action.
Once there is an action required by you the app then offers up a step by step guide for the task you are completing. The guide uses images and clips along with text to walk you through. For the most part, these guides were excellent but there were some leaps of faith at the start when I was trying to identify exactly which part was in the image but a lot of that was down to my inexperience with the equipment rather than the guide itself.
The brewing stage is broken into 4 steps; Preparing, Mashing, Boiling and Chilling.
Preparing as the name suggests, gets the equipment ready to start brewing. The main part of this was flushing hot water around the keg which had to be mounted in the appliance, have valves and tubing connected and afterwards, it cools itself down via the water supply.
Cooling took far longer for me than what the app was suggesting so this gave me my first opportunity to test what level of support was being provided by MiniBrew. To get in touch with them you fill out an online form. It took 25 minutes to get a reply from MiniBrew and the person provided some suggestions on how to speed things up.
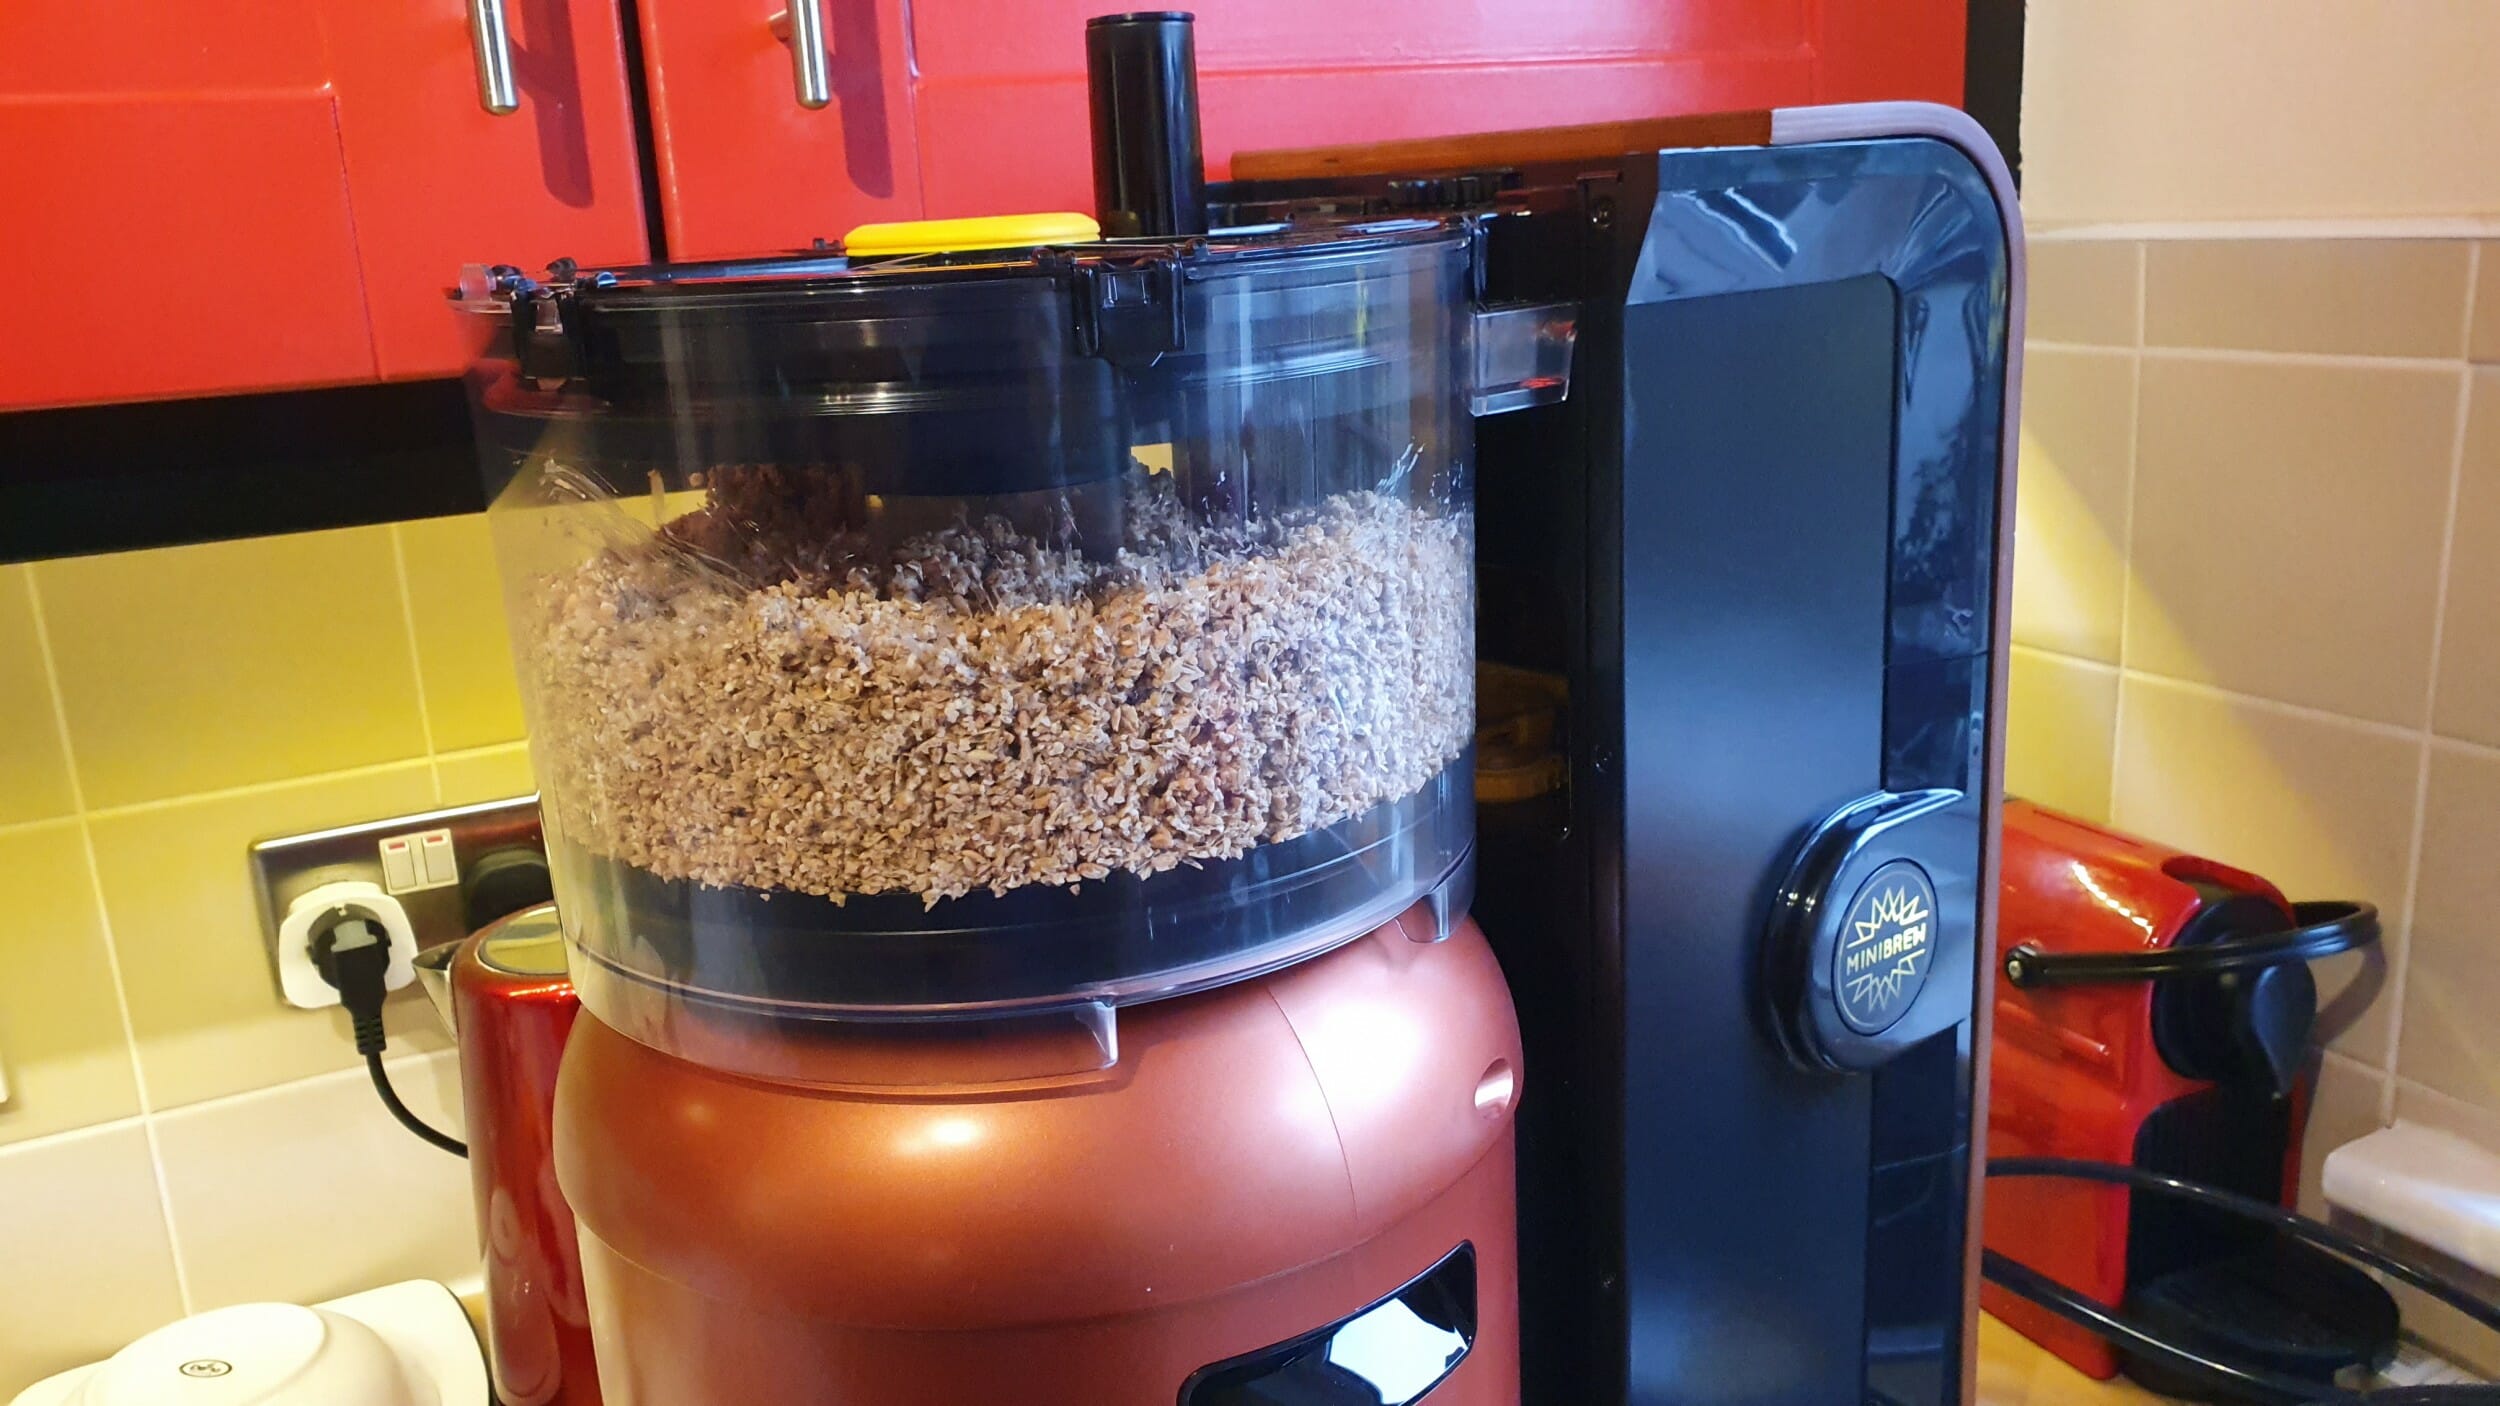
Mashing is really the step where all the fun happens. During this step, you get to assemble the parts needed for the transparent Tun, you wet and add your malt, add a calculated quantity of water to the keg and prepare any other ingredients. The additional ingredients come in small packs and are added to reusable bags for placement in a carousel on top of the Tun. During the brewing, these bags are dropped down into the mix and add flavour to your beer.
During mashing is when you’ll be most active completing steps but it’s also one of the most interesting parts as you get to see the water rising up through the malt in the Tun and the brewing process begin.
Boiling is the next step where the wort in the keg is then raised in temperature to 100 degrees and boiled.
Once Boiling has completed Chilling begins. During this step, the connected water supply is used to cool the wort and after about 30 minutes it’s time to remove the keg from the appliance.
The keg unit needs to be plugged in and has its own temperature control and WiFi connectivity built-in. From this point, it becomes a stand-alone unit as the next part of the process begins.
In the app, you now have two devices showing. The original appliance part and now the stand-alone keg. During our brew, the keg unit spent the next 12 hours cooling the wort further before the fermentation stage could begin.
With the brewing stage now complete and the wort cooling, the appliance needs to be cleaned before it can be stored away.
As with all other steps, the app guides you through the process from start to finish.
To begin the process you add an apparatus to the appliance which you insert a dishwasher tablet into. The appliance then circulates and flushes water around the appliance for about 60 minutes.
The other parts that are used in the process need to be cleaned in your dishwasher. As instructed I ran the parts through a cycle in my dishwasher but I wasn’t happy with how clean they were after the first run. I ran an additional two cycles to get the parts to a point where I was happy they were clean enough to be stored. This is probably more of a reflection on the efficiency of my dishwasher rather than an indicator of the parts being hard to clean but either way, it takes a bit of time to get everything sparkling again.
Once all this was complete the appliance could be stored away until you are ready to start your next brew.
Once the wort was cooled down overnight the next step was to add yeast to it to start fermentation.
At every interaction, the app reminds you to thoroughly wash your hands and to spray copious amounts of cleaning fluid on everything. The cleaning fluid comes concentrated in the service pack and needs to be diluted with water and added to a spray bottle which is also provided.
The lid of the keg unscrews to allow you to add the yeast. This is a critical time for cleanliness as the wort is exposed to the outside world while you are adding the yeats through the opening. Thankfully we navigated this step without anything contaminating the beer. To allow the carbon dioxide that is produced during fermentation escape, an airlock is fitted to the lid of the keg. A plastic container called a trub is also fitted to the bottom of the keg and is used to collect any solids or debris from the brewing process.
During the fermentation period, there isn’t too much user interaction needed. I stored the keg away under the kitchen table and checked the app every few days to see how things were going.
The next step for our brew was clarification. Clarification cools the beer to stop the fermentation process and then starts to clarify it. The trub needs to be removed, emptied and cleaned a couple of times during this process. It was very interesting to see the beer maturing during this time. When I first removed the trub it was full of solids, it was very foamy and not really “beer-like” but it certainly had the aromas of a wheat beer.
During the second time removing it, there were fewer solids and the liquid was starting to take on the distinctive beer colour and by the 3rd time to it looked and smelled like beer. Success! Time to start getting excited.
The last step before serving. To carbonate the beer you are provided with a gas regulator and small canisters of carbon dioxide. These are attached to the top of the vessel and the gas is introduced into the beer over a 24 hour period.
To serve the beer, a tap is attached to the top of the keg. The carbon dioxide pressure is reduced to 5psi and you can then pour your first beer. The keg can keep the beer cool and MiniBrew state you should be able to keep the beer for up to three months in it. I’m guessing most people will have it finished long before that though!
This is going to be a whole new process for most people. There’s a learning curve so naturally, the first time is a little more difficult than normal and as you get more experienced the process will become smoother.
One thing I would like to see changed is how the steps that require your interaction are presented in the app. At present, you can only see one step ahead but often multiple steps happen one after another but you have no visibility of this until you have completed the step before. If you could see every step in advance you could be more prepared by familiarising yourself with the parts needed and the actions required. It would also let you plan how much time was needed to be set aside to complete each task.
The results speak for themselves. As complete novices, we managed to brew our first beer. A beer that was both smooth and fresh and made with only the natural ingredients we added.
I guess the biggest compliment you can give to a company who have launched their product to market is to say that it worked as expected, feels mature and not something that needs another couple of versions to get right.
MiniBrew has created an elegant device that feels refined and can take a novice from being completely clueless to brewing their own beer. The vast majority of issues we encountered were down to our lack of experience with the equipment and we can’t wait to put that right by brewing our next beer!
MiniBrew has created an excellent product and if home brewing is an area you’d like to explore for yourself we can highly recommend trying this system out.
You can find out more about MiniBrew, the different beers available and how to purchase a system on their website: https://www.minibrew.io/. Cheers!
Payoneer, the global financial technology company powering business growth across borders, has announced it has acquired…
Climb Channel Solutions Ireland, an international specialty technology distributor and wholly owned subsidiary of Climb…
The tech skills gap is ever worsening in Ireland, with even large firms struggling to compete with…
Guest post by Paul Turley, ServiceNow, Senior Director Ireland Enterprise Sales Artificial intelligence is reshaping…
By David Stephen If an organization [academic, nonprofit or industry] say they want to solve…
Qualcomm Technologies, Inc. a wholly owned subsidiary of Qualcomm Incorporated, has announced a €125m investment…
Irish Tech News are Ireland’s No. 1 Online Tech Publication and often Ireland’s No.1 Tech Podcast too.
You can find hundreds of fantastic previous episodes and subscribe using whatever platform you like via our Anchor.fm page here: https://anchor.fm/irish-tech-news
If you’d like to be featured in an upcoming Podcast email us at Simon@IrishTechNews.ie now to discuss.
Irish Tech News have a range of services available to help promote your business. Why not drop us a line at Info@IrishTechNews.ie now to find out more about how we can help you reach our audience.
You can also find and follow us on Twitter, LinkedIn, Facebook, Instagram, TikTok and Snapchat.